Time to Complete: ~1 hours
Final Length: Customizable
2 pairs of pliers
Clasp of your choice
16ga 8.0mm ID - 5 rings per inch
16ga 5.0mm ID - 10 per inch
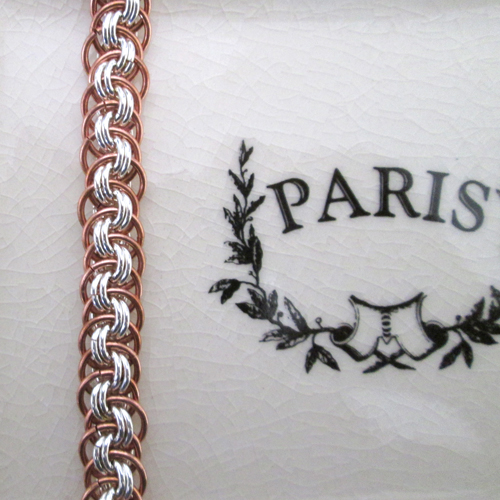
MATERIALS
This project uses 16ga 8.0mm ID jump rings [LARGE] and 16ga 5.0mm ID jump rings [SMALL] for this project.

STEP 1: The Starter
Close a SMALL jump ring. I recommend attaching a piece of scrap wire to help hold onto your project.
STEP 2: Add a New Ring
Attach a new SMALL jump ring next to the first ring.
Jump rings should be side by side.

STEP 3: Add a New Ring
Attach a new small jump ring through both existing rings.

STEP 4: Add a New Jump Ring
Attach a new small jump ring through the initial two rings from step 1 and 2. This is the start of a 2-2-2 chain.

STEP 5: 2-2-2 Chain
Continue adding 2 jump rings to form the length of your chain. 80 rings makes approx 7 inches of chain. Estimate 12 rings per inch of chain. You can always add more before you finish to get the ideal length.

STEP 6: Add a Large Ring
Open a LARGE jump ring and insert it through a pair of rings entering from the right side.
Skip a pair of rings and go through the next pair from the left side. You should have a large ring attached through two pair of small rings. Middle pair of small rings skipped.

STEP 7: Add Large Ring to Next Pair
Move up one pair of rings from your starting place. Add a new LARGE ring entering right to left. Skip a pair and connect to the next pair left to right.

STEP 8: Repeated Task
Locate the next open pair of small rings. Open a Large ring and insert it from the right side. Be sure to be on top of the previous large ring.
Each large ring will sit on top of the previous ring.

STEP 9: Skip a Pair
Skip the next pair of rings. Continue the path of the large jump ring through the next pair, from the left side moving right.

STEP 10: Close the Ring
Close the jump ring. Notice how the large rings overlap. If you set the project down and lose your place, turn the chain over until it matches the picture.

STEP 11: Add a Clasp
From here, it is repetition. Add a clasp at the desired length.
