
Time to Complete: ~1 hours
Final Length: Customizable
2 pairs of pliers
Clasp of your choice
18ga 4.0 - 4 per inch
18ga 3.0 - 2 per inch
STEP 1: Materials
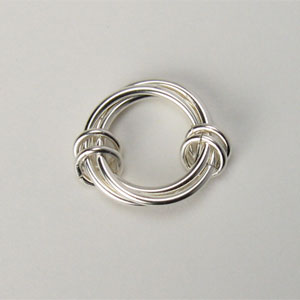
The floret is made with [large] 16ga 12mm ID jump rings; [medium] 18ga 4.0mm ID jump rings and [small] 18ga 3.0mm ID jump rings. You can alter these sizes to fit your own design

STEP 2: Close Ring One
Begin by closing a 16ga 12mm ID jump ring (large).

STEP 3: Add a Ring
Attach one large ring to the first ring.

STEP 4: Organize
Organize the rings by pushing them together.

STEP 5: Link Three
Add a third ring thru the middle of the set of two.

STEP 6: Organize Again
Push all three rings together to make an organized 'floret'

STEP 7: Right Way, Wrong Way
If your floret looks slightly oval, the top ring may be laying incorrectly. Simply flip it over (while still attached) and it should nest correctly.

STEP 8: Keep them Aligned
Attach (4) 18ga 4.0mm ID jump rings (medium) to the floret. Organize the rings so that two are on each side.
STEP 9: Make More
Using the large and medium jump rings. Make as many links as you need to create the proper project length. If you are using the sizes as shown, each link will measure approx. 7/8"

STEP 10: Make a Chain
Using (2) 18ga 3.0mm ID jump rings (small) connect the links together. A single jump ring is sufficient, but two creates the desired texture and continues the theme of the piece.

STEP 11: Add a Clasp
Any clasp will work. Our preference is a ring and toggle clasp that has a similar diameter as the floret, giving the piece continuity.