Time to Complete: 2-3 hours
Final Length: Customizable
2 pairs of pliers
Clasp of your choice
18ga 3.5 - 20 rings per inch
18ga 3.25 - 5 per inch
6mm Round or Round Faceted Beads - 3 per inch
.010 Flex Wire Stringing Material - 3 feet
.5mm crimp beads
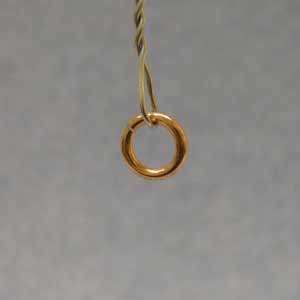
STEP 1: The Starter
STEPS (1 - 6) Use the same size 18ga 3.5mm ID Jump Rings
Close a 3.5mm ID jump ring. Cut a 5" length of craft wire and twist on to create a handle.
STEP 2: Link Two
Open a new jump ring and attach it to the first. Open a second jump ring and attach it to the first ring so that it sits along side. You should now have a single jump ring with two rings hanging from it.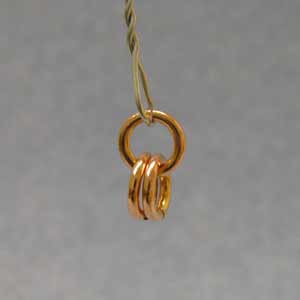
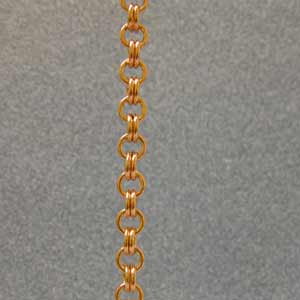
The chain is a simple 1-2-1-2 link.

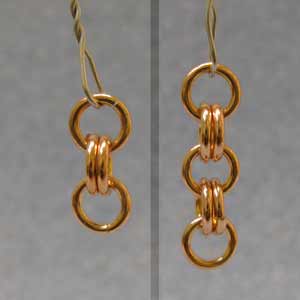
STEP 3: Link One
Add one new ring to the previous two (left side of the photo)
The right side of the photo shows the pattern repeat. Continue adding jump rings in the 1-2-1-2 pattern to create the chain.
STEP 4: Make an Eight Inch Chain
Repeat steps 2 & 3 until you have a chain that is approximately 8" long.
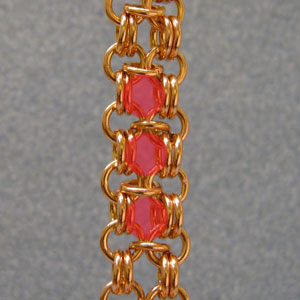
You can use the sizing chart to determine how many rings your bracelet will require. Example: A 7.5" bracelet uses 24 beads. Each double ring set holds one bead (except the first and last set) Your chain should have 24 double ring sets + 2 (first/last) for a total of 26 double ring sets.
STEP 5: Create an Identical Chain
Now that you have your basic chain, make another 8" chain using the same technique.
Notice how the double rings align. Keeping them parallel will be important for a successful chain.

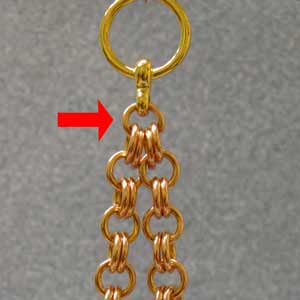
STEP 6: Add the Clasp
Each Chain ends with a double ring. Open a new jump ring and use it to connect the ends of both chains and the clasp together.
Hint: Organize your left over 18ga 3.5mm ID Jump rings and put them away so that you do not accidentally pick up the incorrect size for the next several steps.
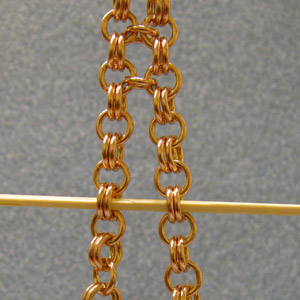
STEP 7: The Zipper
Attach the single ring on the left chain to the matching single ring on the right using the smaller 18ga 3.25mm ID jump rings.

STEP 8: Keep them Aligned
It is important to keep the chains parallel and facing the same way as you "zipper" them together. It may help to hang the chain in front of you while you add the rings. A toothpick or wood skewer can help align the rings and avoid mistakes.
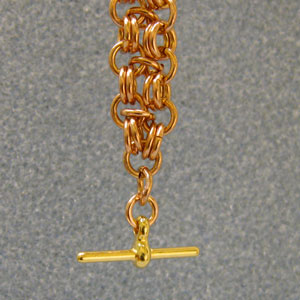
STEP 9: Finish the Clasp
Add the other end of your clasp. The correct chain length may not be evident at this point. After you add the beads the displacement shortens the length by 10%. You many need to add or subtract jump rings prior to putting the last beads in place.
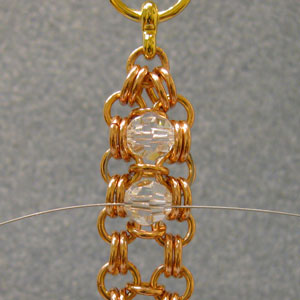
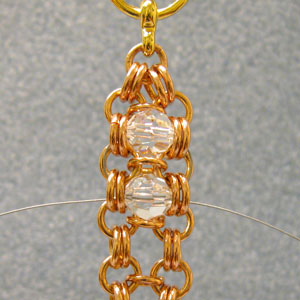
STEP 10: channels Forming
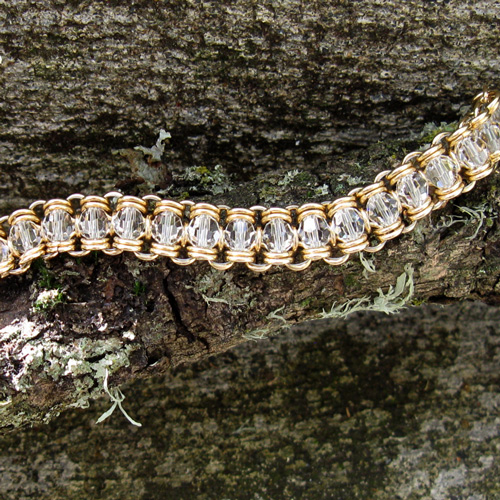
After you zippered the chain together, the channel or pocket that the bead will sit in becomes evident. The channel is formed by double jump rings on the sides and the smaller jump rings form the front and the back.
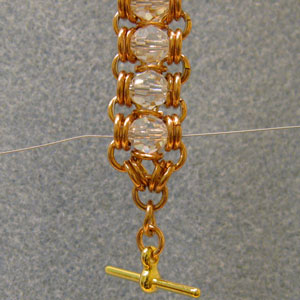
STEP 11: Start Adding Beads
Cut a 36" length of Soft Touch .010" diameter flex wire. Starting at the clasp, identify the sets of double rings. Skip the first set and start adding beads at the second set. Insert the flex wire from the outside in, thru the double rings, thru a 6mm Round or Round faceted bead and exit the flex wire thru the double rings on the other side.
Align the ends of the flex wire. so that you have even amounts on both sides.
Make sure that the flex wire always ENTERS and EXITS through the double rings.
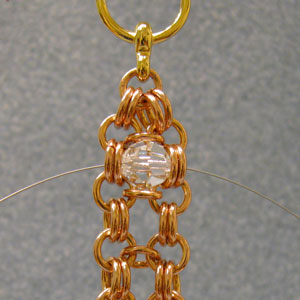
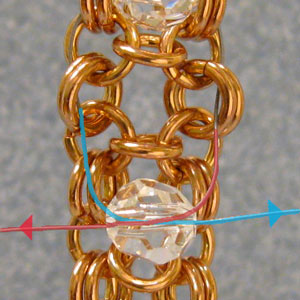
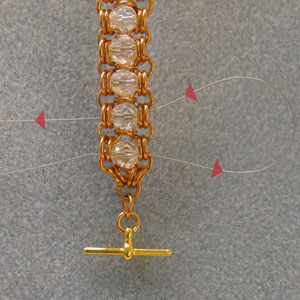
STEP 12: Bring in the Wires
The flex wire on the right enters from the outside of the double rings into the center of the channel.
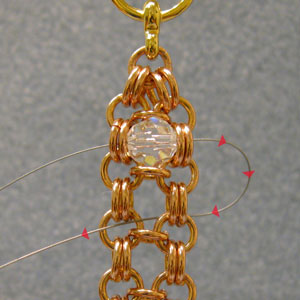
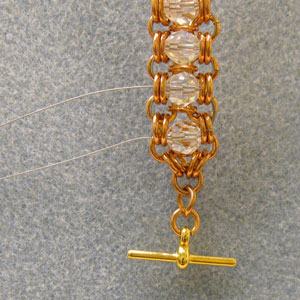
STEP 13: Bring in the Wires cont'd
Grab the left side of the flex wire and insert it through the double rings on the left side of the chain.
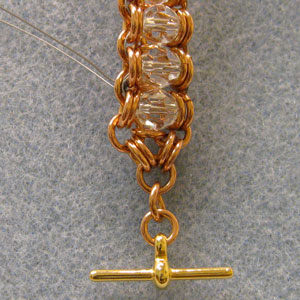
STEP 14: Add the Bead
String a 6mm Round or Round Faceted bead on to the flex wire on the right. Thread the flex wire on the left into the same bead in the opposite direction. The flex wires should cross each other inside the bead going the opposite directions.
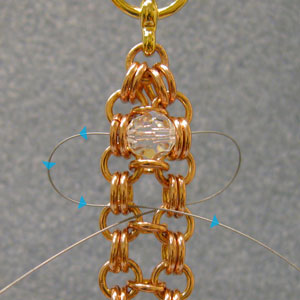
STEP 15: Pull Gently
As you pull both ends of the flex wire the bead will move into its proper position.
Not done yet!
Notice the flex wire is on top of the double jump rings...
STEP 16: Thread Back Thru & Pull Tight
Thread the ends back thru the double jump rings so the flex wire exits inside the rings.
Review. The flex wire enters the channel from the outside of the chain, thru the double jump rings, through the bead, and back out the double jump rings on the other side. Same routine for both ends of the flex wire.
Now pull tight. As you tighten the flex wire after each bead, allow the chain to "caterpillar" or scrunch up. You will straighten the chain flat at the end of the project.
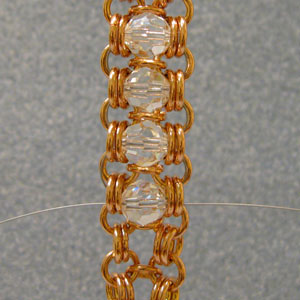
STEP 17: Keep Adding Beads
Before you get too far, check the ends of the flex wire and make they are both the same length. Now is the time to even them up if you are too far off.
Repeat steps 12-16 until you reach the desired length.
STEP 18: Check Your Length
Before you tie off the ends of the flex wire., test the fit of the bracelet. Add or Subtract more "channels" as necessary.
STEP 19: Move the flex wire
To tie and crimp, you need to get the flex wire on the same side of the chain. Thread the flex wire on the right side back through the previous bead.
STEP 20:
Both sides are now together. Tie the two ends together using a square knot or surgeon's knot. To secure the knot from untying, use a small .5mm crimp bead or a drop of bead glue (hypo cement recommended)
STEP 21: Hide and Trim
To create a more professional finish, insert the two ends of the flex wire. through the single jump ring on the side. Pull the knot through to the back of the bracelet and trim the extra length. The knot will be less visible on your project.
SIZING CHART
Use the sizing chart to determine the number of beads necessary for your project. 22 = 7"; 23 = 7.25; 24 = 7.5", 25 = 7.75"; 26 = 8" *Based on the average clasp length of 3/4"; 1 bead increases length by 1/4"